

- April 10, 2014
- 7 Comments
Today I have for you two swatch posts with new Ga-De shades that were recently added to the brand's core line. I was pretty surprised that I didn't notice them at first, but when I realized that these are in fact new shades that didn't see before, I grabbed a couple (well, maybe five or so) and of course was excited to try them. So in this post I will be showing the first shade I picked - Ga-De Vintage Silver (448).

- February 24, 2014
- 3 Comments
Today I'm going to share with you my swatch for Push And Shove from OPI's Gwen Stefani collection. This collection consists of seven different finishes; Creme, Satin, Glitter and Chrome. The colors in this collection are named after Gwen's songs, all the more reason to love them! As a Gwen Stefani fan I was really excited about this collaboration and I think that the colors in this collection are great and classy, but the ones I was most curious about were Love Angel Music Baby, 4 In The Morning and Push And Shove, which I'm going to show you today.
חברת OPI לא מפסיקה לחדש ולהפתיע עם קולקציות מעולות שיוצאות זו אחר זו, והפעם מדובר בקולקציה שנולדה משיתוף פעולה עם הזמרת גוון סטפני. הקולקציה כוללת שבעה צבעים בגימורים שונים: קרם מבריק, סאטן, נצנצים וכרום בגימור מראה. הלקים בקולקציה נקראים בשמות שיריה של גוון, מה שנותן סיבה נוספת לאהוב אותם! בתור מעריצה של גוון משכבר הימים, שמחתי כשנודע לי על שיתוף הפעולה של הזמרת עם חברת OPI וציפיתי בקוצר רוח לצאת הקולקציה. לדעתי כל הלקים בקולקציה מוצלחים כיון שמדובר בצבעים קלאסיים מעולים, אך הלקים שיותר סקרנו אותי בקולקציה הזו הם הלקים עם הגימורים המיוחדים; Love Angel Music Baby ,4 In The Morning והלק Push And Shove שהגיע לידי השבוע, אותו אסקור בפוסט הזה.

- February 07, 2014
- 18 Comments
Hello ladies! In today's Jewelry & Nail Art post I have an amazing ring which I truly adore, and a matching nail art of course! I received this lovely amethyst ring from Delezhen a couple weeks ago, and I can't get enough of it. This ring is absolutely beautiful and it's way prettier in real life, so I hope that trough my photos you can see just a bit of it's beauty. If you liked this ring, you will be happy to know that I have a little surprise for you at the bottom of this post ;)

- January 23, 2014
- 17 Comments
In today's post I'm going to show you the first half of the new Christmas Collection by FUN Lacquer. The new festive collection consists of six gorgeous polishes: one holographic , two glitters, and three thermal shades. In this post I'm going to share with you my swatches for the following shades (L-R): DECENTber, Gold Mark and Winter Wonderland.
I hope you will like these as much as I did, and believe me when I say - they were way gorgeous in real life and it was hard to capture their beauty in photos!
I hope you will like these as much as I did, and believe me when I say - they were way gorgeous in real life and it was hard to capture their beauty in photos!

DECENTber is a red holographic polish. The holo effect was very beautiful in the sun, despite the fact that it wasn't a linear holo it was still lovely. The formula quite surprised me with it's great coverage and I could really see how some of you might be satisfied with just one coat of this holo prettiness. It dried relatively fast but not as glossy, on the other hand I can always apply a top coat.
For the photos below I applied two coats of DECENTber, no top coat.


Gold Mark is a gold glitter topper full of gold holographic glitter. There are a few sizes of gold holographic hexes, squares, and gold flake shimmer in a clear base.
Let me start by saying how gorgeous it was in person! Oh I wish my camera could capture it's beauty. The gold glitter in this polish has a spectacular holographic effect, it's a real stunner!
I love the mixture of the glitter and the tiny gold flakes in this polish, it looks so rich and luxurious.
I applied one coat of Gold Mark over black, and topped it with Poshe top coat.


Winter Wonderland is actually a silver version of Gold Mark. It is a glitter topper full of silver holographic glitter in various size and shapes, and it also has iridescent glitter in the base.
Oh man, I don't think there's a word to describe this amazing glitter, maybe because it's out of this world! This polish is a spectacular glitter mixture that manages to reflect the light beautifully and make it shine like a sparkly rainbow. This was pure magic in a bottle. I think this must be one of the polishes that really impressed me lately. I couldn't take my eyes of this beauty!
I applied one coat of Winter Wonderland over dark blue, and topped it with Poshe top coat.


Just to show you how gorgeous this glitter is, I took another macro shot of it this time in shade - and even then, it's a stunner! Look how this holo glitter reflects the light and shows the entire rainbow in it! Amazing, right? I also shared a short video of Winter Wonderland and on Instagram, hopefully you will be able to see it here as well, if not - you can always check my Instagram feed to see this gorgeous glitter in action.

So far I really like this collection and I was pretty impressed with how gorgeous these polishes looked. I can't wait to try the thermal polishes and share my thought with you guys. Hope you liked this post!
The new Christmas Collection is already available for purchase at the FUN Lacquer Etsy and Facebook stores, so be sure to get your favorite shades while stock lasts.
The full size bottles retail for $13 (16.7ml) and the minis for $7.5 (7ml), shipped worldwide from Singapore.
Follow FUN Lacquer at their social media links for more beautiful polishes and swatches.
- November 25, 2013
- 23 Comments
Today I have an extra sparkly manicure to share with you, I wore it last week but didn't have a chance to share it with you yet.
This festive and shiny look was easy to achieve thanks to these two great polishes I have recently tried and was very impressed with. For this manicure I used OPI Miss You-Niverse as the base, it's a gorgeous dark plum creme which I only needed one coat to achieve full opacity. Over this dark and rich color I layered one coat of this spectacular glitter by El Corazon -Top Fireworks №421/8.


El Corazon -Top Fireworks №421/8 is a silver holographic glitter top coat, consists of shredded glitter and small hex glitter in clear base. This polish contains a generous amount of glitter which makes it very easy to apply evenly with a few strokes. Unlike other shredded glitter top coats I've tried before, this one was relatively smooth even before I applied a top coat.
The glitter was so sparkly and beautiful, even in shade. I was so impressed by this polish and it's amazing effect, believe me it's even prettier in person!


- October 30, 2013
- 7 Comments
Today's nail art is inspired by the fabulous Lime Crime purple lipstick with the silver unicorn imprint.
I actually came across this idea on Instagram, originally made by @vixen_nails, and once I saw this I knew I had to recreate this design.
I actually borrowed this gorgeous lipstick from a fellow polish friend, who I must thank once again for her help, and also a huge thanks to vixen_nails for the inspiration for this nail art.
I wanted to recreate the design and make it as close to the original product as I could. I was happy to discover that one of my recent purchase, China Glaze That's Shore Bright was a great fit for this nail art, and that my Nailz Craze NC02 stamping plate was just perfect with it's unicorn and stars designs.
I was surprised to discover that in real life, the polish I used was the exact same color as the lipstick, what a perfect match!
To create this simple yet gorgeous design I applied two coats of China Glaze That's Shore Bright and stamped over it with Essie No Place Like Chrome (I preferred to use a solid silver rather than a holographic color, which I felt wouldn't give me the perfect coverage). Then sealed the design with one coat of Poshe.
I was really happy with the final look of this design, it was super easy to execute and it resembled so much to the inspiration, so for me this was a success!
Would love to hear what you think about my Lime Crime inspired design ;)


- June 19, 2013
- 20 Comments
I wanted to share with you my manicure from the past few days. Actually I made this design on Tuesday and removed it today so I can do some swatches, so I can definitely say it stayed with me longer than usually.
I really wanted to recreate a delicate design with the dandelion from my Nailz Craze plate (last time I did a mani with this design was a year ago, wow!), and I wanted to combine it with a light and fresh color, so I picked China Glaze Kinetic Candy. It's a dusty light blue, a bit green tinted. I would say it's some sort of minty color, but the "mint" range is so wide you never know whether it's mint, green or blue. It's a beautiful shade in any case!
I applied two coats of Kinetic Candy, then added silver holographic glitter to the top, I wanted to create a reverse glitter gradient. It didn't turn out as I wanted, it just looks like I painted half of the nail with the glitter, but at least I tried lol. The glitter is from a Korean brand called A'Pieu aמd the polish name / number is SV01.
Then I stamped the dandelion design from the Nailz Craze NC01 plate with Konad White, and applied one coat of Poshe to seal the design.
I really love how delicate and sparkly this looks, it wasn't exactly what I imagined but it came out lovely and I received many compliments for this one, so I was happy with it even more!
I hope you liked it too, would love to hear what you think. Thanks for reading and have a lovely week!


- May 25, 2013
- 13 Comments
Today I'm going to share with you my experience with nail foil I received from KKCenterHK for review. They sent me two foil patterns of my choice and a nail foil glue, and in this post I'm going to review the silver holo foil.
I actually picked this nail foil because of it's pattern, you can take a better look at it at their site since I had hard time capturing the beauty of the foil on camera. It's really sparkly, reflective and looks very festive. The foil is 1.5 meters long and 4 cm wide, it's rolled and placed in a plastic jar, which was really good because I've ordered nail foil from other shops before and most of them came in a ziplock bag which didn't keep it in a perfect shape as this one was.
I decided to apply a base color as background in case some parts wouldn't transfer, so I picked Essie No Place Like Chrome for this job and applied one coat of it. I waited for it to dry completely, and then I applied one thin coat of the foil glue. This glue dried quite fast and turned from white to clear, it was very sticky compared to another foil glue I have tried.
Once the glue looked dry but tacky, I placed the nail foil on my thumb and pressed it with a cotton pad to make the application better and smooth. So I rubbed it for a while, but I couldn't transfer it at first. It seemed to me that the foil was glued pretty good to the nail, and no matter how much I rubbed it or tried to lift the foil piece from the nail, it wouldn't lift off. I think it might be my fault, maybe I didn't wait long enough for the glue to dry completely.
Then I tried another method, sort of tapping the foil piece on the nail, so it transferred well but in small pieces, so unfortunately I didn't get the whole pattern but only small parts of it. I kept applying the foil with tap motion to the nail until it didn't stick anymore, and the result is before you. It's a pretty cool metallic look, but not as beautiful as the foil itself. It didn't transfer much of the pattern which was a bit sad for me, but I think I will give it another try. I don't know if it's the glue's fault or mine for not waiting enough, but I plan to experiment a little and let you know my results the next time I try it.
Then I tried another method, sort of tapping the foil piece on the nail, so it transferred well but in small pieces, so unfortunately I didn't get the whole pattern but only small parts of it. I kept applying the foil with tap motion to the nail until it didn't stick anymore, and the result is before you. It's a pretty cool metallic look, but not as beautiful as the foil itself. It didn't transfer much of the pattern which was a bit sad for me, but I think I will give it another try. I don't know if it's the glue's fault or mine for not waiting enough, but I plan to experiment a little and let you know my results the next time I try it.
You can purchase the nail foil I used at this review at KKcenterHK shop along with other gorgeous patterns, and also find many nail and beauty related products on their shop.
Hope you find this review useful, thanks for reading! :)


- May 23, 2013
- 8 Comments
I feel like I have to start this post with an apology - I'm sorry I haven't made a post in a while, I just had the busiest week I had in a long time, I didn't even have the time to change my nail polish! So I guess you can understand how busy I was lol...
But seriously, I feel like it's been a while since I had a decent post here. I believe that now I will have more time to create new nail art and share it with you.
I made this design a week ago and I'm not sure if all of you saw it already, I did post one quick photo of it on the Facebook page but I didn't really like the picture I posted there so I took some new photos the next day when the sun came out.
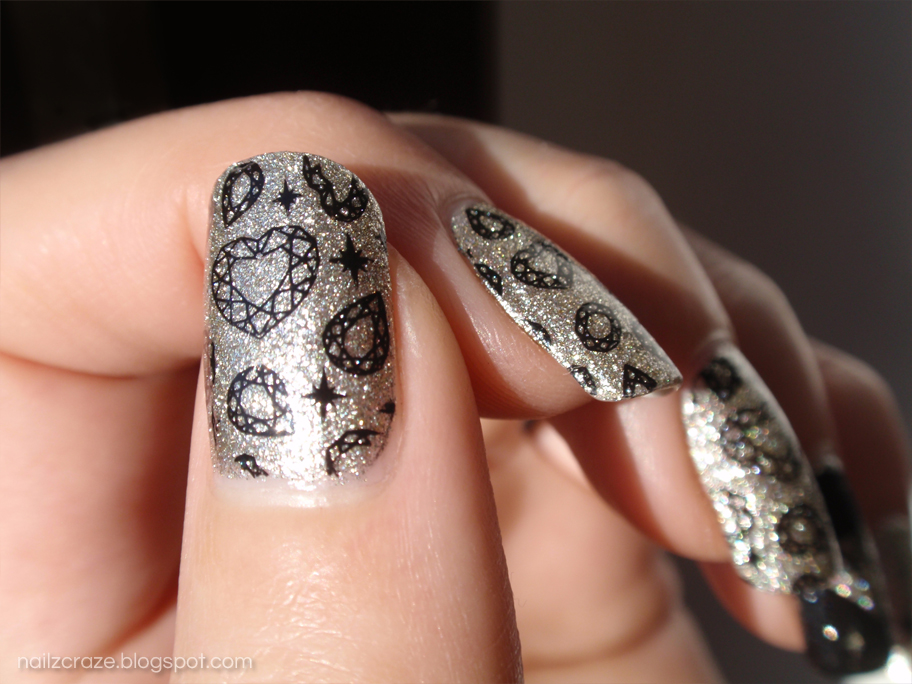
This is the first design I've done with my new Nailz Craze NC04 Glam plate. I was so excited when I got it and I just did a quick mani, tried to include various designs from the plate to show you how they will look on the nails. In these pictures you can see four of the designs from this plate.
For the base I applied two coats of Essie Beyond Cozy (which is gorgeous! It's color is a pale gold, almost looks like silver but I would say it's defiantly gold glitter) and applied one coat of Poshe to smooth it out. Then I stamped over it with Konad Black. I was really happy with how crisp the designs were, I was worried that they might not come out from the factory as well, but they were nice and easy to stamp.
The diamond on the ring finger was a bit tricky because of it's large blank space, but if you use the technique I showed in this video, you should get a nice result. It might take you a while to get it right but as you can see this is doable.
When I designed the Nailz Craze Nc04 "Glam" stamping plate I was inspired by diamonds and gemstones, so you will be able to find these elements in different versions all over this plate.
The diamond stamp (in the middle row on the left) is what I call a reverse stamp, which allows you to stamp over a glitter polish or over layered design with a gradient or a flakie polish for instance, so the end result will look like you stamped with the glitter itself. I've created a similar design on NC02 Magical plate (the reverse clouds image) which allows you to use the same technique as I mentioned before.
Overall I'm pretty pleased with my latest plate and I hope that you will enjoy it. You can purchase this plate at my Etsy store. At the moment I can only offer you NC04 Glam plate along with NC03 Russian plate, the other plates are out of stock, but I'm working on getting them back in stock.
I hope you liked this design and I can't wait to see what my lovely customers will create with this plate :)


- January 30, 2013
- 4 Comments
I got this gorgeous mini trio by Models Own from asos.com and I just love it! When I saw the swatches of these three I knew I will love them, and I thought you would love them too so I decided to get one set for one of my readers as well! If you would like to win this set and more prizes you can enter the Nailz Craze Stamping Contest and submit your entry.
Models Own Mini Glitter Trio is quite a catch, the bottles contain 6 ml and the size of each bottle itself is surprisingly big. I love that they have all the details on the bottles and from the picture you can actually think that these are full size polishes. One thing I didn't get about this set is that it includes two colors from the new Wonderland collection (Southern Lights and Blizzard) and one color from the Dazzle and Sparkle (Pink Fizz). I think it would make more sense if they replaced Pink Fizz with Northern Lights which is a pink version of Southern Lights. But then again, maybe that's the reason they excluded this one from the set, maybe they are too much alike?
Southern Lights is a purple holographic glitter with slightly purple toned base. The glitters are very dense, and just one coat will be enough if you intend to layer it over a similar color. I applied one coat of Southern Light over Essence Oh My Glitter, but this glitter will be great over darker or lighter shade of purple as well. I might even try it over black or other colors than purple.
The glitters are hexagon and really small, all in the same size. The polish is packed with these beauties and it was quite easy to apply. On top of it I added one coat of Poshe to smooth it out, even though it wasn't too gritty, but it looked a bit dull without the top. It was a bit hard to catch the holo effect on camera but that's old news with holographic nail polish, right? ;) Anyways, I think this is my favorite one from this set.
 |
| Blizzard, Pink Fizz, Southern Lights |


 |
| Shade |
 |
| Direct Sunlight |

 |
| Essence Oh My Glitter, 2 coats, Shade |
Blizzard is a silver glitter with various shapes and sizes in clear base. There are large silver hexagons and squares, some of them look very dark but they are actually very reflective. There are also these lovely big and small hexagons that I find it hard to describe, but they look blue and quite transparent, and their color changes to various rainbow colors, depending on the light. These are definatly not holo but I don't know how to describe them - in any case, they are beautiful and this is what made me love this polish even more. There are a lot of silver mix of glitters, but this one is different and I really love it. Spreading it evenly on the nail wasn't as hard as I thought, it was actually nice and smooth. I did need to place a few of them to fill some gaps, but I had worse experiences with other glitter polishes than with this one. On mu nails is one coat of Blizzard over Wet n Wild Frence White Creme (2 coats) and one coat of Poshe.


 |
| Shade |
 |
| Direct Sunlight |
Pink Fizz is pink square fine glitter in clear base.This one instantly reminded me of Butter London Rosie Lee even though I don't own this polish. This one is not very unique but still pretty. I layered one coat over Essie Fiji (2 coats), but I think it could look nice layered a few limes without a base color, or over a similar color. This one was hard to work with, it was streaky and I had areas with tons of glitter while other areas were with no glitter at all, and when I tried to pull them with the brush to even them out, they just stuck to the brush and were drugged alone, leaving bald areas. Maybe it wasn't such a disaster, but compared to the other polishes in this set, this was the hardest to work with. The result is pretty though, but again nothing special. It might be more efficient for glitter gradients, so that's another thing I will probably try.


 |
| Shade |
I was very excited to try the polishes in this set and I can say that overall I really liked it. I think that whoever gets it will enjoy it. These minis are a great way to try these polishes without get the whole bottle, which most of us probably will not finish within out lifetime :) I had a hard time taking the photos since it was gloomy today pretty much all the time, which makes me think I need to get myself a light box so my photos could look like they were taken at the same day, which they were, but since the sun was playing hide and seek with me I had to improvise. So I hope you liked my swatches and the review.
- January 07, 2013
- 20 Comments

