

- January 03, 2015
- 12 Comments
Hello ladies! Today I want to show you my current manicure that I am wearing since last Thursday and really enjoying it. I decided to pair a dark chocolaty base with a gold leaf top coat, and I was very happy with this delicious look.
For this manicure I used two nail colors that I think work really great together - Essie Shearling Darling and a gold leaf top coat Penélope Luz Midas. Keep reading if you would like to find out more about this look!
For this manicure I used two nail colors that I think work really great together - Essie Shearling Darling and a gold leaf top coat Penélope Luz Midas. Keep reading if you would like to find out more about this look!

- March 09, 2014
- 17 Comments
I think most of you already familiar with the Essie's Summer 2013 collection, but just in case you haven't seen it yet, I want to share with you some pics I took of my favorite colors from this collection.
One of my nail polish buddies over seas surprised me with a package including these pretties, I was so happy to get these colors which I absolutely loved from first sight.
One of my nail polish buddies over seas surprised me with a package including these pretties, I was so happy to get these colors which I absolutely loved from first sight.

The collection includes 6 colors, I only got 4 of them, but I feel like I got the prettiest colors of this collection.
Here are the colors from Right to Left: The Girls Are Out, Bikini So Teeny (or Rock The Boat?), Sunday Funday and The More The Merrier.

The Girls Are Out - A purple magenta with silver shimmer

Bikini So Teeny (or Rock The Boat?) - Sky blue shade with subtle silver shimmer
[I've read before that Rock The Boat is very similiar to Bikini So Teeny from last summer's collection, it's a bit lighter and more shimmery than BST. When I got this color I had a feeling that the label and the content of the bottle were misplaced, so I borrowed Bikini So Teeny from a friend to compare the two, and it actually confirmed my assumption, so I'm going to swatch them both to show you the comparison. Bottom line is, I think I have Rock The Boat with the wrong label :)]

Sunday Funday - Bright coral with silver shimmer

The More The Merrier - Bright lime green creme

These colors are so bright and fun, I can't wait to wear them and show you the swatches. The shimmer is hard to notice in the bottles, but it's so pretty and makes the colors pop.
The formula is somewhat between a creme and a jelly, I think most of them will have good coverage with only two coats, but I will have to test this and let you know.


- July 18, 2013
- 19 Comments
I made this cute pastel ice cream design for this weekend and I completely fell in love with it. It was quite easy to make and the result is so pretty and fun, so I'm very happy to share it with you ladies.
I started with two coats of my favorite nude color Essence Iced Latte, then stamped the net design to create the waffle look. I used Cheeky CH11 plate and L'oreal Mauvelous as my stamping polish.
I used a dotting tool to create the dripping ice cream waves, and chosetwo lovely pastel colors; Essie Mint Candy Apple and GA-DE Marhsmallow.
Creating the dripping shape was easier than expected, but I do wish I had a larger dotting tool to make it even easier. Since mine had a really small/fine edge, I had to repeat the dabbing motion a few times to create the desired shape, and then I applies a stroke of the same color on the free edge.
I wanted to add some sparkle to the tips and make it more interesting, so I applied on the dripping tips a bit of fabulous OPI Which is Witch to finish this look and create the "sprinkles" look.
To seal the design I used Poshe fast drying top coat.
The result was delicious! I had so much fun wearing this design and I think it's really easy to execute and get great results even if you don't consider yourself as a pro nail artist. It doesn't require a high skill level and the result is very impressive, so if you haven't tried something like this yet, I really recommend this design to you.
Hope you enjoyed this post and that it inspired you. Thanks for reading!


- June 18, 2013
- 23 Comments
Today I'm going to share with you my experience with nail foil I received from KKCenterHK for review. They sent me two foil patterns of my choice and a nail foil glue, and in this post I'm going to review the silver holo foil.
I actually picked this nail foil because of it's pattern, you can take a better look at it at their site since I had hard time capturing the beauty of the foil on camera. It's really sparkly, reflective and looks very festive. The foil is 1.5 meters long and 4 cm wide, it's rolled and placed in a plastic jar, which was really good because I've ordered nail foil from other shops before and most of them came in a ziplock bag which didn't keep it in a perfect shape as this one was.
I decided to apply a base color as background in case some parts wouldn't transfer, so I picked Essie No Place Like Chrome for this job and applied one coat of it. I waited for it to dry completely, and then I applied one thin coat of the foil glue. This glue dried quite fast and turned from white to clear, it was very sticky compared to another foil glue I have tried.
Once the glue looked dry but tacky, I placed the nail foil on my thumb and pressed it with a cotton pad to make the application better and smooth. So I rubbed it for a while, but I couldn't transfer it at first. It seemed to me that the foil was glued pretty good to the nail, and no matter how much I rubbed it or tried to lift the foil piece from the nail, it wouldn't lift off. I think it might be my fault, maybe I didn't wait long enough for the glue to dry completely.
Then I tried another method, sort of tapping the foil piece on the nail, so it transferred well but in small pieces, so unfortunately I didn't get the whole pattern but only small parts of it. I kept applying the foil with tap motion to the nail until it didn't stick anymore, and the result is before you. It's a pretty cool metallic look, but not as beautiful as the foil itself. It didn't transfer much of the pattern which was a bit sad for me, but I think I will give it another try. I don't know if it's the glue's fault or mine for not waiting enough, but I plan to experiment a little and let you know my results the next time I try it.
Then I tried another method, sort of tapping the foil piece on the nail, so it transferred well but in small pieces, so unfortunately I didn't get the whole pattern but only small parts of it. I kept applying the foil with tap motion to the nail until it didn't stick anymore, and the result is before you. It's a pretty cool metallic look, but not as beautiful as the foil itself. It didn't transfer much of the pattern which was a bit sad for me, but I think I will give it another try. I don't know if it's the glue's fault or mine for not waiting enough, but I plan to experiment a little and let you know my results the next time I try it.
You can purchase the nail foil I used at this review at KKcenterHK shop along with other gorgeous patterns, and also find many nail and beauty related products on their shop.
Hope you find this review useful, thanks for reading! :)


- May 23, 2013
- 8 Comments
I created this nail art for the Indie Polish Nail Art Contest hosted by Kayla Shevonne.
I was (clearly) inspired by the name of the adorable polish by Lush Lacquer - Pink Panther.
This is my first attempt at creating an illustration so tiny with nail polish, and I must say it wasn't an easy task. I knew my chances to create a tiny image straight on the nails would be slim, so I decided to create the drawing as a nail polish decal.
I saw this awesome technique a while back ago, but didn't have a chance to try it until now.
To create the illustration of the Pink Panther I drew my design on a plastic bag with nail polish. Started first with the outlines (I used Barry M Burgundy) using a tiny nail art brush. Then I added small details like eyes, eyebrows and mustache with black Konad polish. Once dried, I applied a clear coat on top of it, and waited for it to dry completely. Then I removed it from the plastic bag, flipped the image and filled the body of the panther, that way I still had crisp outlines. For the inner details of the drawing I used the following polishes: Essie - Van D'go, Essie - Fiji, Barry M - Grapefruit, GADE - Lemon Lime.
It was quite challenging but I really loved how the decal came out. I let it to sit for a while, just because I didn't find the time to complete the design until now, so I can tell you for sure that you can create nail polish decals and put them aside for a while, nothing will happen to them :)
Once I was ready to complete my design, I applied two coats of Essie - Fiji to all my nails. I applied the decal on the ring finger, and on the rest of them I applied the nail polish that inspired this design -
Lush Lacquer - Pink Panther. I topped it all with one coat of Poshe.
Application of the decal I created on the nail was a bit tricky. I had to wait for the base polish to be quite dry, but still tacky so I can place and carefully smooth out the decal on it. And once a top coat is applied, everything looks much better and smooth.
This was one of the most challenging nail art designs I have created lately, and I was really proud of myself. I didn't expect the drawing to come out so nice, especially because it's been a while since I drew with a brush (so tiny!).
Hope you liked this nail art, I would love to hear your though.
Have you tried creating nail polish decals using this technique? Would love to see what you came up with!


 |
| Lush Lacquer - Pink Panther Macro Shot |
- April 27, 2013
- 42 Comments
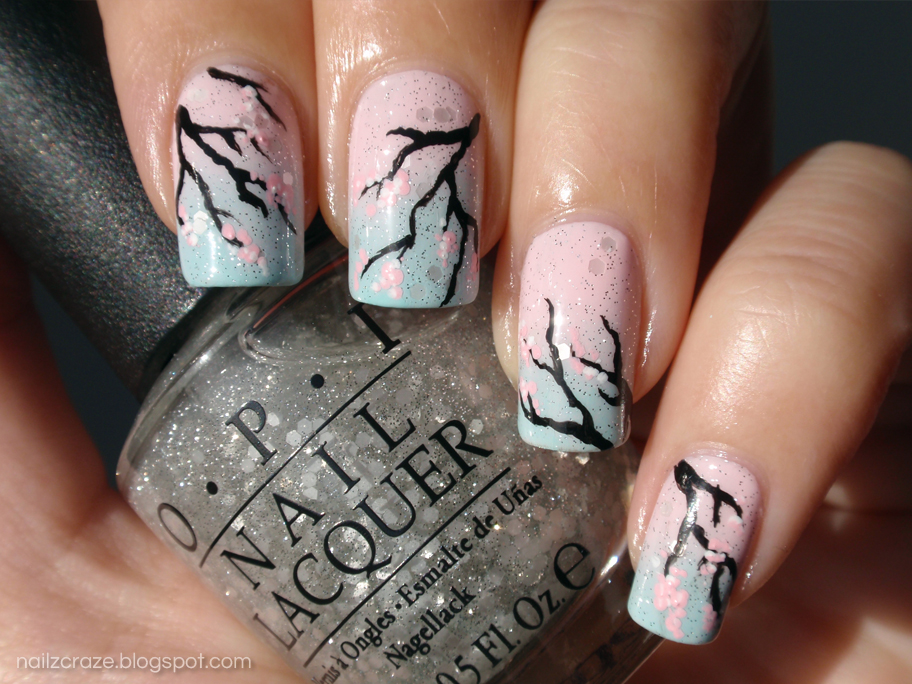
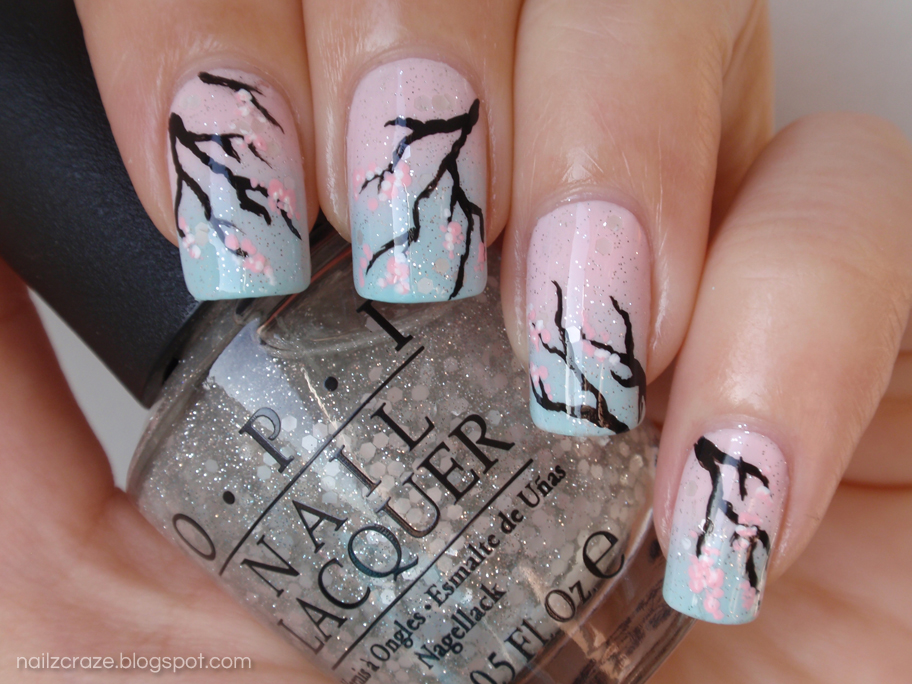
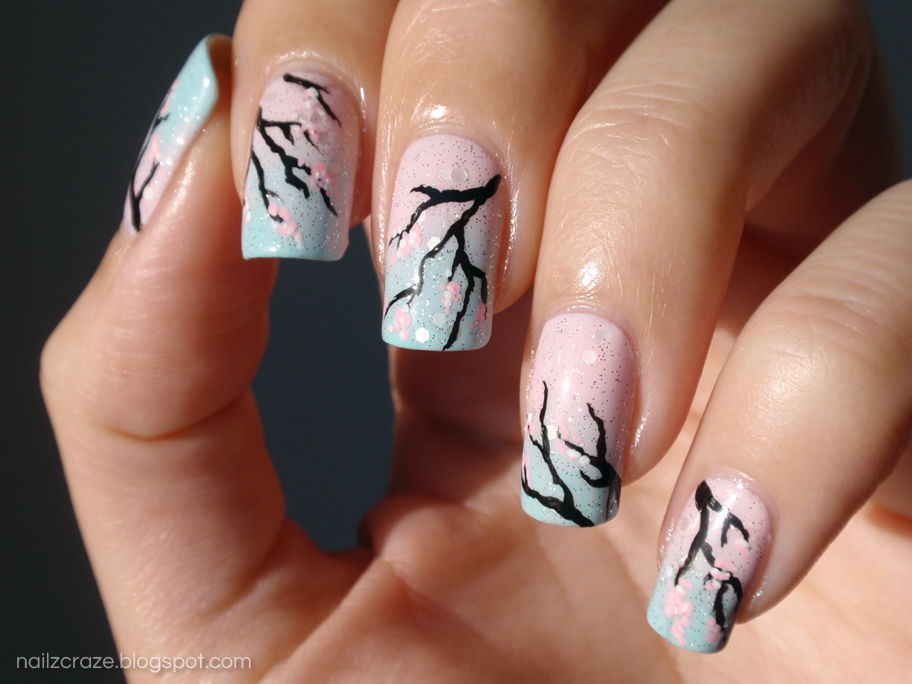
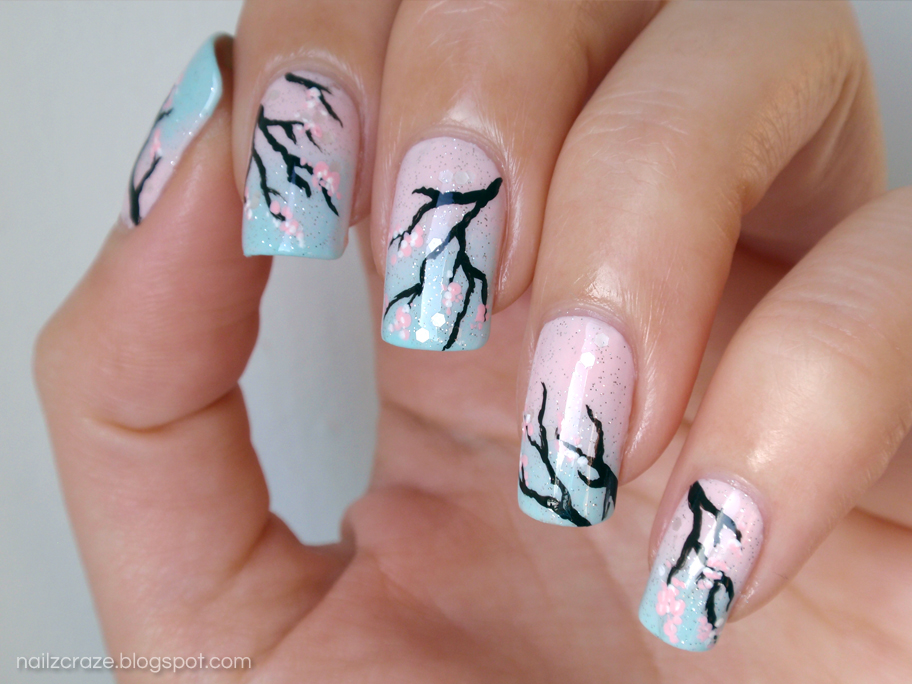
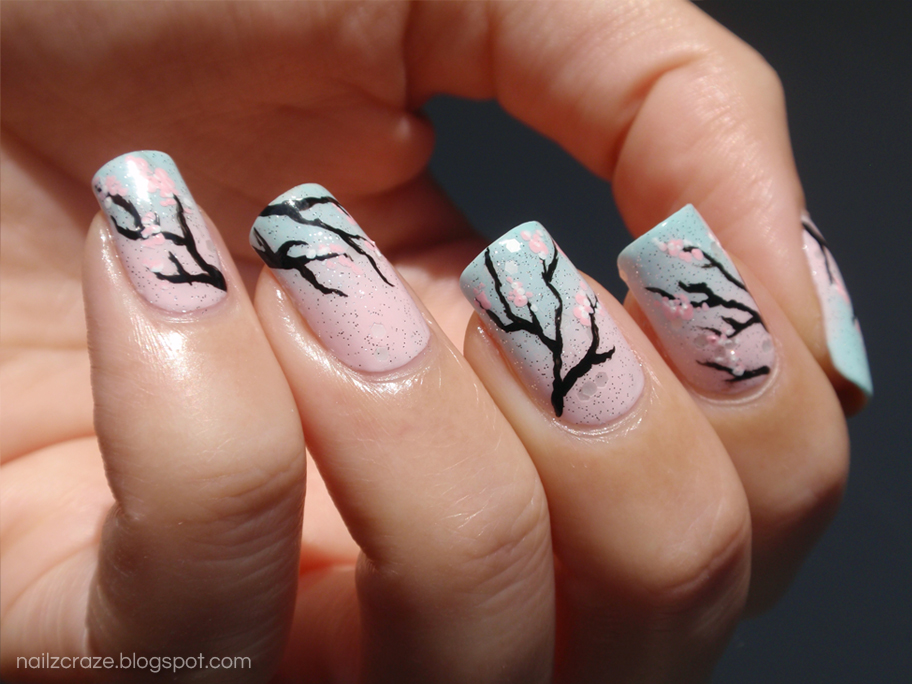
I've been wanting to create this Sakura nail art for a while, and finally I decided to do this as my entry for a spring themed nail art contest I'm participating. This was my first experience with free hand drawing on nails, and I was actually pretty pleased with how this came out.
I really love the Sakura tress, I've never seen one in person but I really hope to one day :) The closest to Sakura blossom I've seen is the Almond tree blossom which is also so beautiful!
I started this design with one coat of Essie Fiji, then created a gradient with Essie Fiji and Essie Mint Apple Candy. Once dried, I applied one coat of OPI Pirouette My Whistle which is a gorgeous delicate glitter combo, I thought it would look lovely with these colors and add a pretty spark to the design.
To create the branches and the little flowers I used a fine nail art brush. I used Wet n Wild Black Creme for the black branches, and Essie Van D'go with Wet N Wild French White Creme for the tiny flowers.
This design came out much prettier than I imagined it will be, I kind of surprised myself with handling the tiny brush, I actually expected the branches to be more chunky but somehow they came out very delicate (well, at least on my left hand lol) and I think this looks nice. Repeating the design on my right hand was quite a challenge and I'm not as happy with it as I was with the other hand, but still - this is a lovely design and I'm pleased with it. I will be wearing it proudly for the couple next days. :)


- March 20, 2013
- 33 Comments
For this weekend I decided to go for something soft and pretty, so I combined these two colors with the roses stamp and the result came out really delicate and feminine.
I was swatching my Essie polishes a few days ago and when I placed these two colors next to each other, I thought this combination of colors was really nice.
I used two coats of Essie A Crewed Interest and stamped with Essie Penny Talk. The lovely roses design is from the DRK-A plate I borrowed from my friend ;) I topped it with one coat of Poshe.
The design came out really delicate and pretty, the photos don't really show the accurate color because of the late afternoon light, but it's still pretty :)


- March 08, 2013
- 23 Comments
Once again I decided to go with something simple but gorgeous, so I picked Essie Leading Lady for that mission. I didn't really had time for stamping or anything complicated this time, so this was a great option for me since this polish is so pretty on it's own.
Essie Leading Lady is a red jelly with small red glitter. It instantly reminded me of my all time favorite China Glaze Ruby Pumps, but this one it a bit darker, so I decided to get this beauty too.
Application was a bit too streaky for my taste, as it was with Essie Beyond Cozy, but it might have been like that only for me since I haven't read any other complaints about their formula. I recall that CG Ruby Pumps was much easier to apply, but I guess that was because the glitter in it was much smaller compared to Essie Leading Lady.
I needed only two coats to get this look, and one top coat of Poshe. I was very pleased with the result. It was so gorgeous on the nails that it made me forget about the tiny trouble I had while applying it, so I think it's a good one after all.
Essie Leading Lady is a very popular color from the Winter 2012 collection and I can assume that most of you probably have it in your collection by now. I would say it is a bit different than CG Ruby Pumps but I think I still prefer Ruby Pumps since it's formula was better to me. But still, having them both in my collections couldn't harm, right? You can never have enough sf a gorgeous sparkly red polish. ;)


- February 09, 2013
- 9 Comments
I decided to go with something simple and clean for this weekend (can you believe it? No stamping, no glitter... Nothing! Is something wrong with me? lol), so I picked Essie - Recessionista for this job. I have this polish for a long time but didn't have the chance to try it yet.
I really love this creamy burgundy color and I think it suits this season, I enjoyed this simple and classy nail polish over the weekend.
I actually didn't have a chance to take the photos at the same day, I did it only the day after I applied it, so it wasn't as bright and glossy as it was on the first day, but I still loved it!
I applied two coats of Essie - Recessionista and one coat of Poshe.
I think you will agree with me when I'll say this is a really simple and a great color. You should defiantly have it in your collection ;)


- February 05, 2013
- 7 Comments
I feel like I have to start this post with an apology - I'm sorry I haven't made a post in a while, I just had the busiest week I had in a long time, I didn't even have the time to change my nail polish! So I guess you can understand how busy I was lol...
But seriously, I feel like it's been a while since I had a decent post here. I believe that now I will have more time to create new nail art and share it with you.
I made this design a week ago and I'm not sure if all of you saw it already, I did post one quick photo of it on the Facebook page but I didn't really like the picture I posted there so I took some new photos the next day when the sun came out.
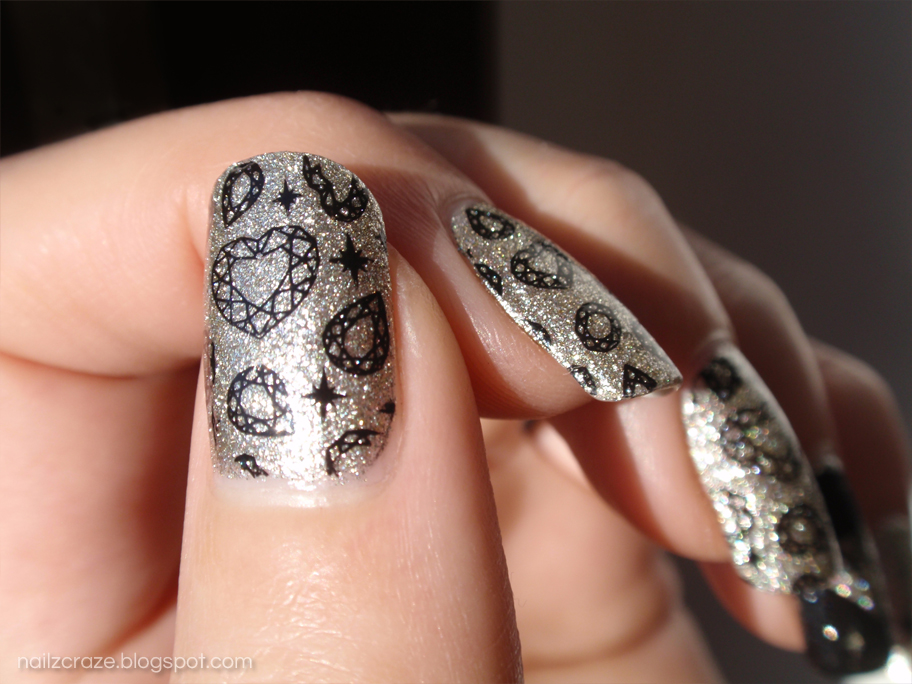
This is the first design I've done with my new Nailz Craze NC04 Glam plate. I was so excited when I got it and I just did a quick mani, tried to include various designs from the plate to show you how they will look on the nails. In these pictures you can see four of the designs from this plate.
For the base I applied two coats of Essie Beyond Cozy (which is gorgeous! It's color is a pale gold, almost looks like silver but I would say it's defiantly gold glitter) and applied one coat of Poshe to smooth it out. Then I stamped over it with Konad Black. I was really happy with how crisp the designs were, I was worried that they might not come out from the factory as well, but they were nice and easy to stamp.
The diamond on the ring finger was a bit tricky because of it's large blank space, but if you use the technique I showed in this video, you should get a nice result. It might take you a while to get it right but as you can see this is doable.
When I designed the Nailz Craze Nc04 "Glam" stamping plate I was inspired by diamonds and gemstones, so you will be able to find these elements in different versions all over this plate.
The diamond stamp (in the middle row on the left) is what I call a reverse stamp, which allows you to stamp over a glitter polish or over layered design with a gradient or a flakie polish for instance, so the end result will look like you stamped with the glitter itself. I've created a similar design on NC02 Magical plate (the reverse clouds image) which allows you to use the same technique as I mentioned before.
Overall I'm pretty pleased with my latest plate and I hope that you will enjoy it. You can purchase this plate at my Etsy store. At the moment I can only offer you NC04 Glam plate along with NC03 Russian plate, the other plates are out of stock, but I'm working on getting them back in stock.
I hope you liked this design and I can't wait to see what my lovely customers will create with this plate :)


- January 30, 2013
- 4 Comments
I wanted to share with you my sweet mani for this weekend. I wanted to use this cute candy stamp from Bundle Monster set and never got to it until now (well, that's what happens when you have tons of stamping plates, but I guess you can relate to that).
I originally planned to stamp it over colorful gradient but then I saw this pink themed contest on Instagram and I decided to go with for pink instead.
For the base I used one coat of Barry M Pink Flamingo, then created a gradient with the same color combined with Essie Plumberry which is a dark pink. I added one coat of holographic top which I got in my latest awesome Christmas swap, I'm not sure what brand it is but it says Holo Top Coat 35, I think it's with the spectraflair effect. you can barely see this in the pictures but it added a nice holo shimmer to the gradient.
Finally I stamped this cute candy design from Bundle Monster BM306 plate and used Konad white which I really adore. I have only two of the Konad stamping polishes (black and white) and I just love them, the image stamps so well and crisp with them, it's awesome! As always I applied one coat of my favorite top coat - Poshe.
I really loved this design and the combination of the sweet colors, this can easily become one of my favorite designs. I'm looking forward to recreate it with different colors. Hope you liked it! :)


- January 21, 2013
- 14 Comments

